WELCOME!

By registering with us, you'll be able to discuss, share and private message with other members of our community.

SignUp Now!

REFERENCE iPhone 11 ISSUE AND SOLUTION

Online statistics

Members online
8
Guests online
102
Total visitors
110

r2r00123

Expired Account
Joined
Jan 30, 2022
Messages
48

iPhone 11​

credits to the owner
not my own, just sharing baka makatulong​

ProblemSolution
No Power
Pull 2A or more before prompt to boot on DC Power Supply
Do a full visual inspection of the board and check for water damage under the stickers on the back. Remove the foam around the connectors to get a better look at everything. You're looking for any signs of corrosion on or around components and ICs.

If there is no water damage, is is most likely a shorted capacitor on any of the below lines:
  • PP_VDD_MAIN — This is the most likely line to be shorted
  • PP_VDD_BOOST — This line is usually shorted when it's not VDD MAIN
  • U_NFC - In some cases, the chip itself can crack & cause a short within the bottom board.
  • Rigel (U4400) — This is a bit rare but it does happen

You'll need to inject voltage (4 V / 2 A) directly into the line you measured as short and use freeze spray (see here https://youtu.be/3MtLSQJvQxI) or thermal camera (see here: https://youtu.be/fkd4iDjgfvc) to spot the capacitor that is shorted.
In these cases, you can just remove the shorted capacitor and not replace it. The device will function normally with no negative effects.
Replacing it means you are adding more heat to the board to reinstall it, which increases the risk of something going wrong.
If you have a case of water damage, then you'll have to pay attention to the spots on the board where there's signs of water damage.
Often, you'll find corrosion on capacitors but also under ICs.

Since this is a 2 layer board, you can split the sandwich into 2 separate parts, top board & bottom board.
  • Then you can check to see if the short is still present when connecting the top layer to the DC Power Supply by itself.
  • If the short is still present, the culprit will be on the top board somewhere
  • If the short clears, then the short is present on the bottom board.
    • So in this case, you can inject voltage into the bottom board to find the short.

Please Note: If you are using a DC power supply to inject voltage through the battery connector, like using an iPower Pro or DT880 (see here https://youtu.be/rawjB9yxe1A), be aware that Yangtze may heat up instantly. This is because the battery connector line PP_BATT_VCC connects to PP_VDD_MAIN through it, which creates lots of heat. In most cases, the short is not the chip itself, but a shorted cap. In rare cases, it's Yangtze itself. So try removing it & check if there's any shorts under Yangtze. If not, then the issue was Yangtze and you'll need to replace it.
No Power — After prompt to boot on DC power supply, current jumps back and forth from 0 A to 320 mA, then 0 A to 1.4 A, then 0 A to 500 mA, and so on

Symptoms:

  • No current draw before prompt to boot on DC power supply
  • After prompt to boot, you see the current jump quickly between 0 A and various values, like 0 A > 320 mA > 0 A > 1.4 A > 0 A > 500 mA

Solution:

  • Check for shorts around NAND
  • Usually you'll find these lines with a shorted capacitor:
    • PP2V63_NAND
    • PP1V8_NAND
    • PP0V9_NAND
  • If so, find the shorted capacitor by injecting voltage

Here's a video tutorial of an iPhone 11 Pro with this same issue. It would be the same for iPhone 11: https://youtu.be/1sboZLnURIc

Please note: PMIC (U1801) will often show lots of heat if you're testing with the DCPS connected through the battery connector but it's not the cause of the short. The short is at the capacitor next to NAND, but since you're connected to the battery connector, the current has to flow through PMIC to get to the short cap, hence the PMIC heats up.
No Service
Always "Searching.." or "No Service"

Symptoms:​

  • Here are the symptoms for cellular signal issues
    • With no SIM Card installed, the phone is always "Searching..." or "No Service".
      • A working phone will show "No SIM" with no SIM Card installed.
    • Dial *#06# in the phone app, and nothing happens
      • A working phone with no Baseband issue, will make the IMEI pop up.
    • If you go to Settings > General > About > Model Firmware is blank

Troubleshooting & Solutions

Sandwich separation
  • Split the sandwich & check for ripped pads on the top layer
    • If so, try to fix the ripped pads by scratching out the vias/traces & rebuild the pads using solder lugs
  • If no obvious bends, then test the 2 layers with the iSocket type of jig. This allows you to connect the 2 layers without soldering, for testing purposes.
  • See if the above symptoms are resolved. If so, sandwich the 2 layers back together & fully test with an active SIM & make sure all functions work
    • Including making a phone call & checking for sound through phone call
    • No sound during a phone call points towards a bad sandwich reball or separation

Cracked "WTR"
  • WTR is the transceiver chip, labeled "U_XCVR" on this model
  • It is often cracked, so visually check it for any cracks on the physical chip.
  • Part# on the chip itself: 5765
  • If the chip is cracked, replace it, re-sandwich the board & test again.

Bottom Board Swap
  • Doing a bottom board swap is an easy way to rule out the whole cellular circuit, as it's pretty much all located on the bottom board.
  • You do need to transfer the BBCPU, BB Eeprom & WiFi.
  • You should consider swapping over NFC as well, although it's not required.

BBCPU Reball
  • You can considering trying a BBCPU reball to see if this fixes the baseband issue
  • This is good for someone who doesn't have a replacement bottom board available.
  • Although there's a lower chance of success, as baseband issues aren't always a BBCPU reball solution.
    • It could be BBPMU
    • Or some other part of the complex circuit.

PA_HB_K shorted
  • replace amplify radio signal strength

Please note: If you attempt the above repairs, but it's still stuck in "Searching..." or "No Service", then flash an update (DO NOT RESTORE). This can sometimes solve the issue. Not sure why it is needed sometimes.
If a phone with a baseband problem is restored, then the iOS software will "erase" the IMEI (baseband info) in the phone and will require the board issue to be fixed, then restored again, so the software will bring back the IMEI.
If you restore, and still has no IMEI, then a baseband/board issue is still present on the board. That will need to be fixed, then restored again.
No WiFi or No Bluetooth
WiFi button is grayed out
Symptoms:
  • WiFi button is grayed out
  • Bluetooth button is spinning forever
  • Sometimes Bluetooth works, but no WiFi

Solution:
  • In majority of cases, the cause will be due to the 2 layer sandwich board has separated.
  • Split the sandwich, fix any ripped pads that may be present, reball & re-sandwich the board
Unable To Activate

Symptoms[edit

  • If a phone has been restored and stuck at the Hello screen
  • You try to activate and get the "Unable To Activate" screen

Solution​

There are 2 potential causes
  1. Baseband issue. See above Baseband Issues for solutions
    1. See if it has the IMEI in the info "i" page. If it's missing, then it's a baseband issue.
  2. NFC issue due to the sandwich separation or damaged NFC.
 
Last edited:
Phone freezes at the last digit of the pin codeSymptoms:
  • Phone boots fine
  • Type in your pin code & at the last digit, it freezes, keeping that digit highlighted for about 30-60 seconds
  • Then the screen restarts and you're back at the pin code screen.

Solution:
  • Usually it's a sandwich issue, so follow the above "No Service" steps to solve the problem
    • Sandwich reball
    • Or Bottom Board Swap
  • If you do a bottom board swap, without transferring the original NFC, the phone will go through a "swipe to recover" screen in most cases, where you put in the pin code, it loads a white "Attempting Data Recovery" screen & takes about 10-20 minutes.
  • This is basically the operating system rewriting the NFC chip, so it can unlock.
  • Then, the phone will work fine afterwards
No ImageSymptoms:
  • Turns on but displays nothing on the screen
  • You can see it's charging over 1A
  • It makes noises & vibrates (but not always)
  • Tested with known good screen, but still no image.

Solution:
  • Diode mode the display connector, J5700, and check for any abnormal readings
  • Check for any shorts on
    • PP1V8_DISPLAY_CONN
    • PP5V7_DISPLAY_AVDDH_CONN
    • PN5V7_DISPLAY_MESON_AVDDN_CONN
  • Check the PP_CHESTNUT_CN/PP_CHESTNUT_CP Capacitor C5600
    • Since it has no legs on ground, you'll need to measure across it for continuity.
    • It should NOT have continuity across it. If it does, it needs to be replaced
  • If still no image, replace Chesnut (U5600)
Error 9
Error 35
Both Error 9 and Error 35 have the same behavior

Symptoms:
  • Bootlooping
  • Attempted Update or Restore & it failed with Error 9 or Error 35
  • 3U Tools Flash will fail at 20%

Solution:
  • This requires NAND to be replaced

NAND Programming Process​

Requirements
In order to successfully replace the NAND, you'll need the following from the original device or NAND and write it to the replacement NAND, otherwise it won't activate.
  • SN (Serial Number)
  • WiFi Mac Address
  • BT (Bluetooth) Mac Address
It's also recommended you set these to the correct values, but technically will function fine if you put different values
  • Region(USA, China, Japan, UK, etc.)
    • LL/A is for USA
  • Color(Black, White, Rose Gold, Red, etc.)
    • This sets the boot up color of the screen. iPhones with a white screen will boot with a white background and black Apple Logo and vice versa for black screen devices.

Tools​

You can use any NAND programmer that supports iPhone 11, 11 Pro, 11 Pro Max
JC P11F seems to be the most popular.

Unfortunately, there is no USB NAND programmer that uses Purple mode. So the iRepair P10 will NOT work.

What if I don't have the original NAND data?​

You can get the required NAND info from above, by reading the original NAND from the device.
In most cases, you should be able to read the NAND data.
If it can't, you'll need to find it elsewhere
  • GSX report (You'll need to find someone who offers this service)

Sometimes, the GSX report service is not available.

Without the original NAND data, you'll never be able to activate the device unfortunately.

After replacing the NAND, you'll need to restore the device & it should be fully functional afterwards.
Random rebooting (usually after ~3 minutes after boot)iPhone 11 models require certain sensors to be detected by the operating system, otherwise it will reboot every 3 minutes & record this error in the panic log.

For iPhone 11, there are 3 sensors that must be detected.
On the Charging Port, there is:
  • Mic1
  • Prs0

On the Power Button Flex, there is:
  • MIc2

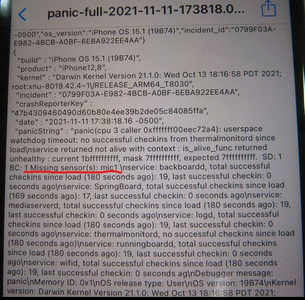
To find the panic log on the device, go to Settings-> Privacy-> Analytics & Improvements-> Analytics Data-> Scroll down to the files starting with "panic-full..." & click on the most top one.
Example of a Panic Log
image_2022-10-31_033424836.pngAlternatively, you can use a tool like the iDevice Panic Log Analyzer, which will download the panic logs from the device & display them on the PC & give you suggestions to possible solutions. It makes it easier to browse the panic log file.

If you find the above errors, replace the appropriate flex with an OEM or Premium flex.
It is also a good idea to keep a known good power button flex & charging port flex in your bench, for testing only. There are reports of even NEW flexes being bad. So you have to keep known good flexes on hand at all times, so you don't waste your time troubleshooting with possibly bad flexes.

In scenarios where you have the appropriate flexes plugged in, but it still restarts, then you either have:
  • Bad or damaged flex
  • Low quality aftermarket flex
  • Other flex cables that are Liquid Damaged


    • Super common to see the connector on the upper left, where the volume button portion connects to the extension flex.800px-IP11_Volume_Flex.png
    • iPhone 11 Volume Flex with Liquid Damage
  • For iPhone 11, you may run into a scenario where there is sandwich separation causing the REARMIC2 line to be disconnected from the bottom board, causing the phone not to detect it & causing the phone to restart every 3 minutes.
    • You'll need to split the sandwich and check for broken REARMIC2 pads. If so, scratch out the vias, solder some solder lug disks & resandwich. Then test again.

Please note: You MUST have the required flex cables, Power Button & Charging Port, plugged in. Otherwise it WILL restart. You cannot troubleshoot this step by unplugging the bad flex.

See this video for a full tutorial on reading the panic logs & how to use the iDevice Panic Log Analyzer tool: https://www.youtube.com/watch?v=QaJLYbtuCGA
A list of other panic log errors that may encounter: https://vccboardrepairs.com/panic-log-list/
Bootlooping
Error 4013
Symptoms:
  • Shows apple logo for about 5 seconds, then blank, then apple logo, then blank
  • Sometimes it shows a green flash for a second
  • If you try to flash an update or restore, it fails right away with an Error 4013
  • If you flash on 3u tools, it fails at 19%

Solution:
Flex Cables:
  • Step 1 in this case is always unplug all the flex cables.
  • Ideally test the board with known good Screen, Battery & Charging Port.
  • If it boots, then one of your flexes is the cause.
    • 99% of the time, it is the ear speaker flex. The Flood Illuminator and/or the ALS has liquid damage.
    • The ear speaker flex is paired to the logic board for Face ID.
    • If you want to keep Face ID, you'll need to repair the flex. If Face ID is not important, then you can just replace the flex.
      • To repair the flex, you'll have to desolder the component & clean out all the corrosion, then place them back.
      • If the corrosion is too severe & it damaged the flex, then you'll need to swap the Flood Illuminator and ALS to a new flex, otherwise, you'll lose Face ID.
    • In some cases, another flex can cause this issue like a bad charging port.
      • In this case, just replace the flex

Please Note: If the phone is stuck in Recovery Mode because it failed at the Error 4013, you have 2 options
  1. Kick the device out of Recovery Mode using 3U Tools. In the main screen of 3U Tools, you'll see a button that says "Exit Recovery Mode"
  2. You can attempt another update or restore.
Assuming you fixed the root cause of the bootlooping issue, the above 2 options should get you a working phone.
If it still fails at 4013 or still bootloops, then you haven't solve the issue.
Long boot than upon boot freezes with half screen image and boot loopsCheck charge port FPC connector pin 44 circuit line PP_VAR_USB_RVP the pin diode reading should be around 0.468 this is the value from a Fluke 115
Not chargingAssuming iPhone is being tested with known-good charging port and battery: If the iPhone recognizes when the charger is connected and the charging symbol appears in the status bar yet the phone is not actually charging, the culprit is often Hydra 1612A1
 

Attachments

  • image_2022-10-31_033300603.png
    image_2022-10-31_033300603.png
    443.2 KB · Views: 9
Last edited:
Backlight
Or Partial Backlight

You'll want to check these first to confirm you have a board issue:​

  • Get a known good screen — Helps validate that you have a board issue.
  • Check USB Charging Current — If an iPhone shows proper charging current (≈1 A via USB or more), then mostly likely the device is alive.
  • Listen to for any sounds or vibration — Helps confirm if the phone powers on.
  • Turn off the phone, then plug in the charger and use a flashlight onto the center of the screen, to look for the Apple logo — This helps confirm you are getting image, but no backlight.
  • Check for water damage. Often times, the backlight circuit gets hit the hardest in water damage cases.

Solution​

In most cases, no backlight is caused by blown resistors/filters on the backlight circuit.

Please Note: The backlight circuit on the iPhone 11 is underneath a shield. This shield is difficult to remove while the top layer is on the sandwich. It is easier to split the sandwich, work on the top layer to do all the repairs & then re-sandwich the board, to avoid any warping or disturbance to the sandwich.

Here's a video of what can happen if you try to remove that shield without splitting the sandwich: https://youtu.be/1dUuwvpBT-Q

These resistors/filters are the most common to blow:
  • R5730
  • R5733

Sometimes, a broken backlight coil can cause it.
  • M5500A
  • M5500B

You'll need to use Diode mode on your multimeter to find the blown filter. (see video for the full process of diagnosing the backlight: https://www.youtube.com/watch?v=K-FFSMiHXPw)

Since backlight comes from the LCD connector, this is the connector you want to check the diode mode readings. Essentially, you're comparing the diode mode values of a known good board vs your problematic board. Most boardview software, like ZXW, will provide the known good diode mode values and you can use that as reference. Expect to see a small ±5–10% variance of what you get.

With a backlight issue, you should find a pin on the LCD connector to read OL, when it should be giving you a diode mode reading. This line with the OL is what you want to investigate further.
These are the lines to expect to find an issue:
  • PP_DISPLAY_BL12_ANODE
  • PP_DISPLAY_BL34_ANODE
Also, sometimes, you can get lucky and visually spot the blown filter, but it's recommended to use your multimeter to confirm it's bad, as well as check the rest are good.
  • A good/working filter will have continuity across it and will have the same diode mode reading on both sides
  • A blown filter will not have continuity across it. In diode mode, you'll find one side has a diode mode reading and the other side will have either OL or a reading that is a larger value than what it should be.

The replacement filter should be the same value of the original. You can see the values in the schematic or boardview software like ZXW.
Please Note: Never use a jumper wire as a replacement for a filter. This can permanently damage the phone if a surge in current occurs and there's no filter to protect the circuit.
Once you replace the filter, check that you be able to diode mode the connector again and find that the pin that was reading OL, is now giving you a proper reading.
Now you can test again and confirm the backlight is working again.
Stuck in DFU Mode
Error 4014

Symptoms:​

  • You get no image from the screen
  • You plug into computer and iTunes/3U tools detects it in DFU mode
  • If you try to Update or Restore, you get these results:
    • iTunes Error Code: Error 4014
    • 3u Tools Easy Flash: Fails at 19%

Cause:​

  • Error 4014 is usually "NAND not detected".
  • For iPhone 11, due to the shape of the board, it is common to see a row of pads underneath NAND to be ripped.

Solutions:​

  • Check the caps around NAND to see if they're shorted.
    • If there's a short, remove the shorted cap and try to boot the phone up.
  • If no short, pull the NAND & checked for ripped pads
    • If ripped pads, you'll need to repair the pads, reball NAND & place it again
  • and connect it to the JC P11F NAND programmer and see if it's readable
    • If it doesn't read, the NAND is dead and needs to be replaced
    • If it does read a NAND, then you can reball NAND and install it again. The phone should boot right up.
Phone freezes at the last digit of the pin codeSymptoms:
  • Phone boots fine
  • Type in your pin code & at the last digit, it freezes, keeping that digit highlighted for about 30-60 seconds
  • Then the screen restarts and you're back at the pin code screen.

Solution:
  • Usually it's a sandwich issue, so follow the above "No Service" steps to solve the problem
    • Sandwich reball
    • Or Bottom Board Swap
  • If you do a bottom board swap, without transferring the original NFC, the phone will go through a "swipe to recover" screen in most cases, where you put in the pin code, it loads a white "Attempting Data Recovery" screen & takes about 10-20 minutes.
  • This is basically the operating system rewriting the NFC chip, so it can unlock.
  • Then, the phone will work fine afterwards
 
Last edited:
Back
Top