
Understanding Samsung Odin options
While downloading the right version of Odin for your Galaxy device is the easy part,
understanding how it exactly works is the real question. A first look at the main screen
of Odin as seen in the screenshot below can be quite daunting to somebody who has
never used the software before.
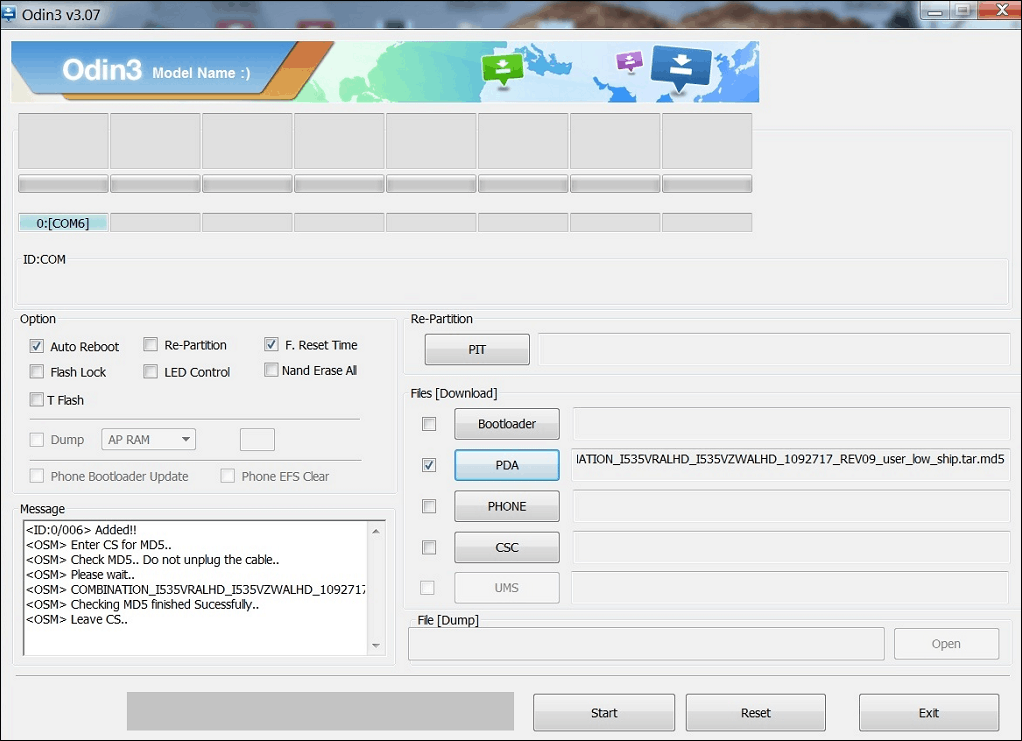
Here’s a breakdown of all the options and the main buttons on the right side that come
with Samsung Odin and what their uses are:
Auto Reboot –
You can use this checkbox option to set the device to automatically
reboot once the device software flashing process is complete.
Re-Partition –
The option enables you to re-partition the device to its default state. It
is especially useful if you end up partitioning your device and incur issues.
Reset Time –
Simply enables you to reset the flashing timer once the entire firmware
flashing or rooting process is completed on Odin.
PIT –
Defined as the Partition Information Table, this button can be used with the “Re-
Partition†checkbox to set a customized partition system on your device. You will need
to specify a .pit file to flash with Odin when using this button.
Bootloader –
This button is used to flash a custom bootloader to your Galaxy device.
You will need to procure a compatible bootloader file and insert into Odin to flash it.
PDA
The main button that the majority of users will be using no matter what Odin
version to use, PDA helps to flash firmware build to the device. Simply press the button
and insert the compatible Samsung firmware or custom ROM that you want to flash on
to your device.
Phone
This refers to the baseband/modem version of the device.
CSC
Referred to as Consumer Software Customization, this button is intended to help
you add a .CSC file to the device. These type of files contain details such as regional or
carrier specific files which may include APN/MMS settings for the carrier.
While downloading the right version of Odin for your Galaxy device is the easy part,
understanding how it exactly works is the real question. A first look at the main screen
of Odin as seen in the screenshot below can be quite daunting to somebody who has
never used the software before.
Here’s a breakdown of all the options and the main buttons on the right side that come
with Samsung Odin and what their uses are:
Auto Reboot –
You can use this checkbox option to set the device to automatically
reboot once the device software flashing process is complete.
Re-Partition –
The option enables you to re-partition the device to its default state. It
is especially useful if you end up partitioning your device and incur issues.
Reset Time –
Simply enables you to reset the flashing timer once the entire firmware
flashing or rooting process is completed on Odin.
PIT –
Defined as the Partition Information Table, this button can be used with the “Re-
Partition†checkbox to set a customized partition system on your device. You will need
to specify a .pit file to flash with Odin when using this button.
Bootloader –
This button is used to flash a custom bootloader to your Galaxy device.
You will need to procure a compatible bootloader file and insert into Odin to flash it.
PDA
The main button that the majority of users will be using no matter what Odin
version to use, PDA helps to flash firmware build to the device. Simply press the button
and insert the compatible Samsung firmware or custom ROM that you want to flash on
to your device.
Phone
This refers to the baseband/modem version of the device.
CSC
Referred to as Consumer Software Customization, this button is intended to help
you add a .CSC file to the device. These type of files contain details such as regional or
carrier specific files which may include APN/MMS settings for the carrier.
https://updato.com/how-to/what-odin-version-you-need-for-your-phone